Monday, December 17, 2012

Pages

The Kindle case project left me with a bunch of book pages.  I sat there and tore out chapter after chapter.  This book had been a freebie I picked up for wedding decor.  Better I use it for parts than have it hit the bin, huh?


These simply had to be used further, so I decided to make a paper flower wreath.  First I freehand drew 4 sizes of petals out for templates:


 Here there are, large all the way to little.  Instead of attempting something more puffy and elaborate, I'm going to have flat flowers.  Each bloom will have a charm or some beads for its center, easy to assemble with hot glue.  If the gods of spare change are kind to me, there will be some iridescent glitter purchased to put on the edges.  Extra pizazz is very important. 


I have a freebie embroidery hoop I'm going to use for the wreath base.  There will be a lot of flowers, since this was a several hundred page history book.  I'm cutting them out about 5 or 6 pages at a time to speed up the process.  This also ensures there's a little variation between batches to look cuter.  

This wreath will take a while, since it's tiring on the old paws to cut out petal after petal after petal!  But it's something I can work on here and there, like in the evenings when it gets too cold and quiet.  They're great to do when watching some old repeat on Netflix!


Kindled Spirits

An emotionally-exhausting December has given way to a little spurt of creativity.  Even the simplest projects are renewing for me.  I decided to finally make a Kindle case for the family Kindle (well, the one I let Himself use once in a while ;))  And here's how I did it!

First, I pressed the fabric I wanted to use.  It's been folded into a drawer for who knows how long, so I thought it'd be good to drag it out, instead of using newer stuff. 


Next I gutted a book that was damaged and destined for crafting anyway.  I needed the covers only, so I even took out the spine, because it was far thicker than the Kindle.  The pages are going to another project.


Next, I measured out the exact fabric I needed.  I would have done this first, but it was so wrinkled that I didn't think I'd get an accurate figure.  So out came Ma's old sewing box and this handy doodad:


Next, it was time to start gluing.  I tacked the corners down with hot glue and then the edges, pulling it taut, but not tight, since I wanted to be able to close the thing:


Some scrap booking paper served to cover the seams:


The straps were a bit tricky, and I needed both my hands, so I didn't photograph the steps.  I pretty much eyeballed it.  I wanted 2 ribbons where they wouldn't obscure the keys or screen.  I held them around the kindle itself to trim them to a length where they were *almost* too short to go around it, plus 2 extra inches to fold under the device.  I pinched an inch and glued it to the cover, repeated it for the other side, until I had restraints for the Kindle.  Luckily, I got it right, and I was able to slide the reader in under the ribbons and have them hold.  I wouldn't waggle the holder around a lot, but for regular use, the ribbons work.


I glued some more of this pretty cotton ribbon down the "spine" to cover the little fibers from the book covers. I may replace this with wider ribbon in the future, since I dind't anticipate how much the covers would distort the spine area when folded back. 


And here we are, with a little "bookmark" plume at the top!  Almost done...


There we go!


And it's working pretty well!  If I ever make another, I'll play around with ways to reinforce the spine, since that's the most vulnerable part of the design.  But for an afternoon's whimsy, this ain't so bad :)


Saturday, December 1, 2012

How to spice up a boring day...

Hair has always been the achilles heel of my look.  I've got really, really thick and wavy locks, so it seems a sin to complain about them. But I do, sometimes. As much as I love my hair, I can't do anything with it.  After a certain length, I can barely keep it in a bun, because of the weight tugging at my poor scalp!

So I've been cutting it shorter over the years, trying to make it easier to manage.  Since I'm in "pretirement", I don't have the funds at this moment to go for a regular haircut.  Last one was in May, right before my wedding.  I started trimming it up myself not too long after, to clean up the edges a bit and keep my bangs out of my eyes.  But yesterday, I looked in the mirror and realized it got to the point of looking like a mushroom.  It was time for something!

I've been flirting mentally with a pixie cut for ages, wondering if I had the gumption.  I googled tutorials for this style, and one of the first to pop up was Rachele, of The Nearsighted Owl.  Rachele's a proponent of the pixie for full-figured women.  What really got me tho, was that she and I are pretty similar in frame and face shape.  This made me decide!  If she could pull it off, I could, too!  So I sharpened my sewing scissors (the closest I have to real haircutting scissors) and I went to town.

I went from this....


...To this in an afternoon!


It actually didn't take that long.  I was in the bathroom, snipping away for about an hour and a half.  It's a little puffy right now, because the hairs have never not been weighed down, but I expect it'll calm down in a day or two.  

I felt a little nervousness as the first large lock hit the towel, but I was committed, so I kept going.  And it worked!!  It's great, I can wear regular hats now!  I have a vintage cap from goodwill I've never been able to get on my head properly, but now it fits.  My husband has more fedoras than any one man can wear, so I think I'll be borrowing some for the sheer fun of it. 

What fun this was.  Now to bundle up and go about the day's errands :)

Friday, November 16, 2012

Still alive! - now with photos!

I hadn't realized it had been that long since I updated the craft blog!  Oh noes!!  We survived Sandy with incredibly good fortune.  The only damage was a torn-up porch roof and a few pounds of spoiled ground beef (the power was out for nearly a week).  It was cold, dark, and tough at first, but we realized how lucky we were.  Our home is in NJ, and we're north of the shoreline, but not by much.  So think a kind thought and donate a buck or two (or some warm clothes and food) for our neighbors in the rest of the state and in NY, who are going through a lot.

In the meantime, we've been going on business as normal here.  Crafting took a hit since without artificial light, I found it too hard to bead.  Instead, I borrowed Husband's nib pens and india ink and tried to re-learn calligraphy.  I used to have a way with gothic and uncial, but I am woefully out of practice!!  Instead, I mucked around a bit, and started my own hand (Script) which is really a more elegant version of block lettering.  I've been trying to develop it further, as I have a fun project in mind....making miniature books!

In addition to jewelry and such, I also write poems from time to time.  But I have come to the conclusion that noone is going to publish anyone's anything anymore - unless you're already published.  To that end, I have decided to William Blake it, and make my own books completely by hand.  I don't have the fine arts skills Blake did, so my little volumes will be much more spare, but I will be hand lettering and sewing each booklet.  Photos are pending - I'll take care of those after today's errands otherwise I'd never leave the house!


Portions of one of my poems, named after one of Italo Calvino's Invisible Cities, Eudoxia, which is replicated (or symbolized by?) an intricately worked carpet.  You can wander and wander through Eudoxia and the carpet patterns for ever...


This next one is from a quickie book I sewed during the power outage.  I was keeping dawn/dusk hours, so I made use of my daylight to practice the stitching.  It wasn't the best, as I was going from memory, but that's ok for now.  The book is composed of little envelopes, and each contains a tiny, more or less playing-card sized piece of paper with a particularly beautiful line of Symbolist poetry on it.


EDIT: Here's some photos of other stuff!


In other news, I will have another post featured in BlogHer's money section on the 27th!  I must figure out how to cross post between ViW here and the little in-house BlogHer blog I keep.  I've also got to start adding photos to my BlogHer posts, so I've opened up a flickr account as well, with a link on the sidebar.  What hi-tech sorcery we must do!

So there we are, fully recovered and ready for Thanksgiving.  I'm typing this on the laptop, snuggled in bed with a sleepy spouse and two warm cuddly puppies, feeling very very lucky.


Friday, October 26, 2012

Staring down the storm...

So Hurricane Sandy is projected to slam the NE by early next week.  Mr. Liz and I went for some minor grocery stockups today.  I'm thinking we'll get some water "just in case" tomorrow.  Even though I'm hoping it'll all be a big nothing, I made the mistake of reading a blurb that likened it to the big storms in the early 90s.  And even tho I was a little girl, I remember those well!

I hate to play into weather paranoia (they're calling it "Frankenstorm"!  Really!) but I do want to be sensible.  So we'll put some things by, charge up torches and cell phones, and make sure relatives are ok as can be. 

In the meantime, here's a blog update!  The craft room has seen some serious action lately, what with my Halloween costume and its 1001 props.  I did find some time to do some smaller projects, such as a necklace and a mini wunderkammer:

This necklace started life as a vintage buckle.  I picked it up in a teeny little antique store in Key West while honeymooning.  So I had to find some special use for it.  I glued in a castle from a 15th century image (well, the 20th century art history text reprint)....


...backed it with some leaves for support, and added a pretty cotton ribbon left over from wedding decorations.  It's light and summery.  A bit late for the season, tho! Still, it's far simpler than many of my necklaces.  It still makes a statement, but in a subtle way, so it would be good for an office, maybe with some very small antiqued gold earrings.  Since it's such a fond memento, it is *not* destined for the shop :)


Almost forgot this fascinator!  When I was making the fan for my costume, I threw this together as a side project.  The vertebrae are too pretty to sit there unused, but their shape and delicacy limit their applications.  Luckily, they are good for headgear, since they won't be touched much.  I added in some peacock feathers (more wedding leftovers...that was the project that kept on giving!) and a rather pretty plastic button.  The whole thing is glued to a barrette, and looks darling.  This one needs a better photo shoot and an etsy listing!


One of my go-to craft blogs is The Feathered Nest .  Dawn has the loveliest projects, with a scrumptious neutral palette.  So I took some inspiration from her Victorian style and started this mini wunderkammer.  I was about to pitch this box, but it called to me.  It's cream and brown, and pretty sturdy.  The flower on top is grey and cream (a lucky find while purging!).  The objects on the "shelves" are tiny things I treasure.  They were just sitting on my bead organizer, since I like having them near, but I worried about them being knocked over, or falling into trash piles.  No more...


There's a vintage compact that belonged to my Grandmother, from the days ladies would "powder their nose".  Inside is a mix of tiny objects, with a miniature portrait of my Great Grandmother.  The medallion is my Mother in her graduation gear - she was so proud to earn her degree, and I was proud to go with her - even tho I was a little girl!  The corals are from Sombrero Beach in the Florida Keys, a few of many Mr. Liz and I scavenged.  We only took the dead bits that had washed up and bleached, leaving plenty behind for others to find....


This little bottle has a scroll with a line from E. E. Cummings' "i carry your heart", and it also contains itty-bitty fragments of the geode we smashed in our unity ceremony.


Finally, another chunk of coral, and some truly tiny delicate shells from Crane Point in the Keys.  One of the prettiest spots we went to the whole trip :)

Later on, when I find the right scraps, I'll decoupage some stuff on the "walls" to fill the space visually just a little more.  And the whole thing needs some pretty paper on the back to cover up the rough ends of the hanger.  But all in good time!

Now to fix up some dinner and make sure we have plenty of batteries, kibble, and candles!
 

Wednesday, October 17, 2012

Medica Della Peste! (props)

This year is the first time since high school I have had a dedicated Halloween costume!  This is quite exciting.  I'm going to be a plague doctor/Venetian carnival reveller.  This ensemble is the product of one late night's hurried inspiration and about 3 days of intense making.  I have modded my wedding skirt slightly into something shorter and poofier (thinking of the sheer volume of carnivale outfits), picked out my plainest shirt and vest (to not distract from the headgear), made the hat of all hats, and an array of props.

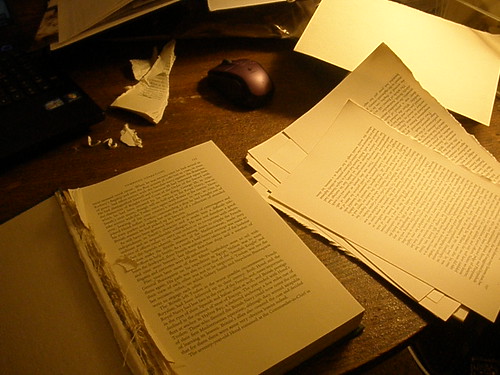
Many of the photos are on my laptop, so I'll have to edit this post later.  But I had to share some goodies.  first off all, a good plague doctor will carry charms, prayers, and all sorts of thingums to counteract the foul vapors arising from the city streets!  I carefully drew up an old "abracadabra" charm, and copied a couple from Defoe's A Journal of the Plague Year.  


I figured I'd also need a fan to wave away the stench of the plague houses...or the aroma of Venetian canals...


And a mask!  Of course one needs a mask.  This one is a two-buck plastic shell from AC Moore's.  I spraypainted it, lined the edges with gold paint marker, and added a charm because one must.  There is no room for reticence at Carnival.  Or in the Eat, Drink, and Be Merry hedonism of soon to be plague cities...


And one needs mystical things for the otherworldly atmosphere of the Carnival....Behold, a Rider-Waite tarot deck that got a pretty sweet makeover.  A while back, I was going to make a Tibetan-style book.  But I made the mistake of gluing all 72 cards to one side of the papers, thereby making a wedge, rather than the "block" of pages that would then be bound with decorative boards.  Still, there had to be something to do with them....


I cut them out, trimming them to rectangles, which to my eyes looks more "ye olde".


I stamped the backs (which were the plain paper they were affixed to ages ago).  This stamp is little bits of medieval/ren/old typefaces, so it keeps things looking anachronistic.


And here's a half-finished card.  The tarot were not done with their journey yet, however...they had to be antiqued!


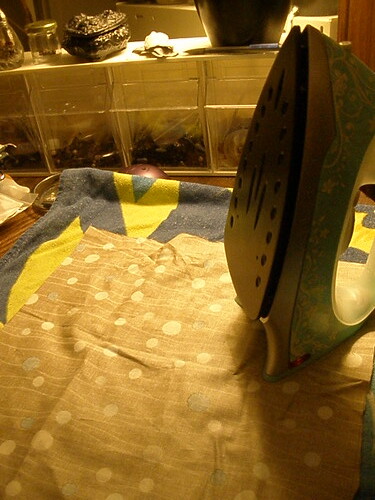
Here's some of the cards, laid out on a baking pan, covered with coffee and grounds, in the time-honored DIY paper aging method.  I did this for the programs for my wedding and got pretty good at it.  All you do is  drizzle/sponge coffee onto your paper (let it cool!), sprinkle grounds for added age spots, and bake until dry on your ovens' lowest setting.  You'll have to keep an eye on the paper, and make sure the rack is not right up by the heating element, but you can end up with some really cool results.  And your kitchen will smell of coffee if you're into that :)


If you have one of those pod-brewers like the Keurig, you can still do this.  Just rip the foil off the used pod and you have a few batches' worth of grounds!  This can get messy, but cleanup's easy.  A damp dishrag will rescue your stove and counters.


At the end of this, I was left with a tarot deck that was yellowed, a bit wrinkled, and looked like it had seen some years.  Just the way I wanted it!


Ok, here is the hat of all hats.  It's built onto a fedora my husband wanted to get rid of.  I cut out a larger brim from a cheerios box, as well as a top, and hot glued them to the fedora.  I was inspired by tophat-like carnival head-dresses.  Top hats are pretty basic, so they seem like a good place to start  with DIY millinery.


I proceeded to cover the "shell" with burgundy satin, and gluing the whole thing.  Inch by inch...fold by fold!


 I added all manner of stuff, once it was covered.  Flowers, a little skull, lace for height!  I went nuts.  Since revellers must conceal their identity, I wanted to make sure I'd be covered, so I added a  burgundy velvet placemat to the back of the hat.  There's a similarly colored window valance now as a veil for my face.  Surely, I will be a mystery :)


This was an interim shot, just to show some friends what I did on day 1.  These are the potpurri sachets for the "posey" I'll be carrying to ward off the plague.  They smell divine!  They're 2 blends from Wellcat.com that I used in my sachet tutorials.


The posey itself is really an antique salt shaker I found at a secondhand store.  I'm presuming it's really old, since it's metal, but who knows.  It makes a great holder/stand for the posey.


I couldn't leave well enough alone, so I added the skull and jawbones to make a chimeric beast :)  Because I can!


And there you have it, most of the bits and bobbins I'll be putting on myself for this Hallows eve!  I'll have some shots of the full ensemble posted soon!